HEIC to JPG/PNG User Guide
Batch Conversion · Local Processing · Privacy First
Tool URL: https://www.qudo.cc/ja/heic-to-jpg
Suitable for users who need to convert HEIC/HEIF images from iPhones and other devices to widely compatible JPG or PNG format for sharing, uploading, or editing.
All conversion is performed locally in your browser. Files are never uploaded to Qudo servers.
This guide is based on the actual interface of the Qudo HEIC to JPG/PNG Converter. It covers opening the page, uploading HEIC files, configuring output settings, batch conversion, and downloading the converted images. Follow this guide to complete the entire conversion workflow.
1. Tool Overview
Qudo HEIC to JPG/PNG is an online tool for converting HEIC/HEIF images to widely compatible JPG or PNG format. HEIC (High Efficiency Image Container) is the default image format used by iPhones and iPads running iOS 11 or later, but it's not widely supported on Windows, Android, or many websites.
Qudo Tools is an online tool platform focused on privacy protection and browser-local processing. All image conversion is performed within your browser; files are never uploaded to servers.
Common use cases include: converting iPhone photos for Windows compatibility, preparing images for website uploads, sharing photos with Android users, and converting HEIC images for e-commerce platforms or social media.
2. Output Format Selection
The tool supports two output formats:
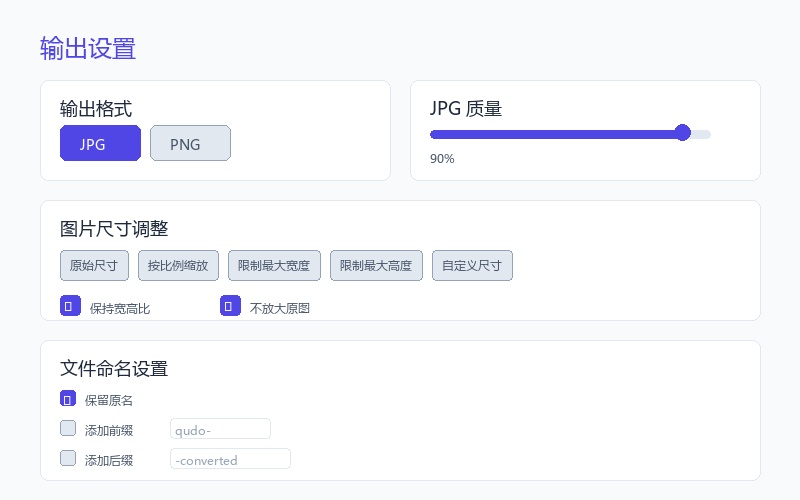
JPG (JPEG): Best for photographs and complex images with gradients. Uses lossy compression to reduce file size. Quality can be adjusted from 40% to 100%. Recommended for most use cases, especially when file size matters.
PNG: Best for images with text, graphics, or transparent areas. Uses lossless compression, preserving all image details. File sizes are larger than JPG but quality is perfect. Recommended when you need transparency or maximum quality.
Choose JPG for photos and general use. Choose PNG when you need transparency or lossless quality.
3. Quality and Size Settings
For JPG output, you can adjust the quality slider from 40% to 100%:
60% - Small file size, good for web use and email attachments. Some quality loss is visible.
80% - Balanced quality and size. Recommended for most photos and general use.
95% - High quality, minimal compression. Recommended for printing or archiving important photos.
You can also resize images during conversion:
Original Size: Keep the original dimensions (default).
Scale by Percentage: Resize to a percentage of the original (5% to 100%).
Limit Maximum Width: Set a maximum width in pixels (default 1920px). Height adjusts automatically.
Limit Maximum Height: Set a maximum height in pixels (default 1080px). Width adjusts automatically.
Custom Size: Specify exact width and height in pixels.
Additional options include 'Keep Aspect Ratio' (enabled by default) and 'Don't Enlarge Original' (enabled by default to prevent upscaling).
4. Batch Conversion
The tool supports batch conversion of multiple HEIC files at once:
Upload multiple files by clicking the upload area or dragging files into it. You can select up to 50 files at a time, with each file limited to 50MB.
You can continue adding more files after the initial upload by clicking 'Continue Adding Files'.
Each file shows its thumbnail, filename, size change after conversion, and status (pending, converting, completed, failed, or cancelled).
All files are processed in batch. Click 'Start Conversion' to begin processing all pending files.
You can cancel the conversion process at any time by clicking the cancel button.
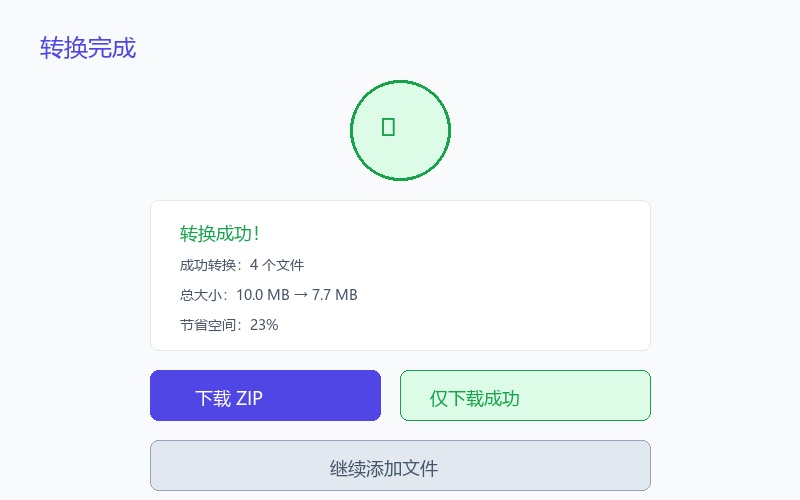
After conversion, download all files as a ZIP archive using 'Download ZIP', or download only successful conversions using 'Download Successful Only'.
Individual files can be downloaded, reconverted, or deleted using the action buttons on each file card.
5. File Naming Settings
You can configure how converted files are named:
Keep Original Name: Use the original filename with the new extension (default).
Add Prefix: Add a custom prefix to the filename (default 'qudo-').
Add Suffix: Add a custom suffix to the filename (default '-converted').
Add Sequence Number: Append a sequence number to each filename (optional).
The tool shows a real-time preview of the filename format as you configure the settings.
Duplicate filenames are automatically handled to prevent overwriting.
6. Usage Steps
Before starting, save the HEIC files to be converted in an easy-to-find location and confirm the files are not corrupted. For important materials, keep a backup of the original files.
Step 1: Visit the tool page. Open https://www.qudo.cc/ja/heic-to-jpg in a modern browser such as Chrome, Edge, Firefox or Safari. After the page loads, confirm the tool title is HEIC to JPG/PNG, and check whether the page shows privacy instructions such as local processing and no file upload.
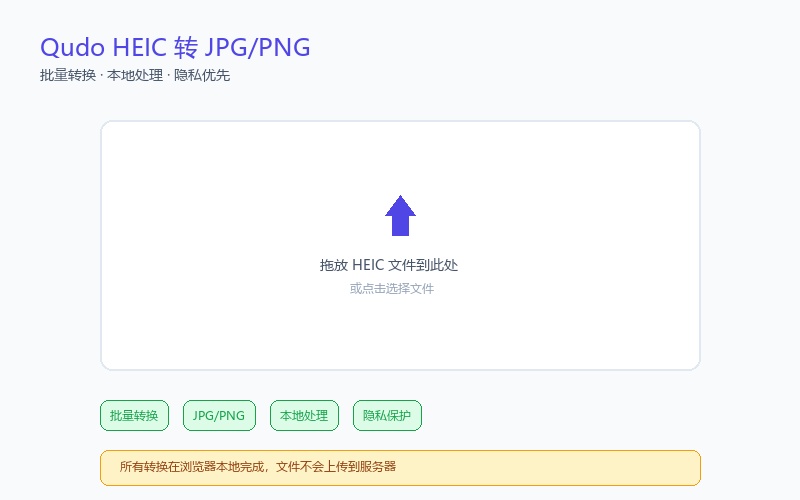
Step 2: Upload HEIC files. Click the upload area or drag HEIC files into the designated area. You can select multiple files at once. The tool supports up to 50 files, each up to 50MB. After upload, file thumbnails and information will be displayed.
Step 3: Configure output settings. On the right side panel, select the output format (JPG or PNG). For JPG, adjust the quality slider or use preset buttons. Configure resize options if needed. Set file naming preferences.
Step 4: Start conversion. Click the 'Start Conversion' button. The tool will process all pending files. A progress bar shows the current status. Do not close the browser tab during processing.
Step 5: Monitor conversion progress. Watch the progress bar and file status updates. You can cancel the conversion at any time if needed.
Step 6: Download results. After conversion completes, click 'Download ZIP' to download all files as a single archive, or 'Download Successful Only' to download only successfully converted files.
Step 7: Verify the results. Open the converted images in your image viewer or operating system to verify the quality and format.
Step 8: Individual operations (optional). You can download individual files, reconvert specific files with different settings, or delete files from the list.

7. Privacy Protection Statement
Qudo HEIC to JPG/PNG processes all files locally in your browser. HEIC files are never uploaded to Qudo servers or any third-party servers.
The conversion algorithm runs entirely in JavaScript within your browser using the heic2any library for HEIC decoding. No data is transmitted over the network during the conversion process.
After conversion, the original files and converted results remain on your device. Clear your browser cache if you want to completely remove traces of the processed files.
EXIF metadata (including GPS location, device model, etc.) is automatically removed from converted images, protecting your privacy.
For documents containing sensitive information, using this tool is safer than online services that upload files to remote servers.
8. FAQ
Q1: Will the HEIC file be uploaded to a server?
A: No. All processing is done locally in your browser. Files are never uploaded to any server.
Q2: What is the difference between HEIC and HEIF?
A: HEIF (High Efficiency Image Format) is the container format standard, while HEIC is the specific implementation using HEVC (H.265) compression. In practice, they are often used interchangeably.
Q3: Will converting HEIC to JPG reduce image quality?
A: JPG uses lossy compression, so some quality loss is inevitable. However, at 90% quality or higher, the difference is barely noticeable. For lossless conversion, choose PNG format.
Q4: Should I choose JPG or PNG?
A: Choose JPG for photographs and general use where file size matters. Choose PNG when you need transparency, text clarity, or maximum quality without compression artifacts.
Q5: Why is the converted file larger than the original?
A: HEIC uses advanced compression (HEVC) that achieves smaller file sizes than JPG or PNG. Converting to these formats naturally results in larger files, especially PNG which is lossless.
Q6: Will GPS location and EXIF information be preserved?
A: No. EXIF metadata is automatically removed from converted images to protect your privacy. This includes GPS coordinates, device model, camera settings, etc.
Q7: Why do the colors look slightly different from my iPhone?
A: iPhones use HDR and wide color gamut (P3) for HEIC images. When converting to JPG/PNG, the colors are mapped to standard sRGB color space, which may appear slightly different but is more compatible.
Q8: Can I convert multiple HEIC files at once?
A: Yes. The tool supports batch conversion of up to 50 files at a time, with each file limited to 50MB.
Q9: Does the tool support multi-frame HEIC (Live Photos)?
A: No. The current version only converts the main frame. Multi-frame HEIC files like Live Photos are not fully supported.
Q10: Can I use this tool on my phone?
A: Yes. The tool works on mobile browsers, but batch conversion of many large files may be slow or cause memory issues on low-end devices.
Q11: Why can't some HEIC files be opened?
A: Some HEIC files may use codecs or features not supported by the browser-based decoder. Ensure the files are standard HEIC format and not corrupted.
Q12: What browsers are supported?
A: The tool works on all modern browsers including Chrome, Edge, Firefox, and Safari. For best performance, use the latest version of your browser.
9. Important Notes
1. Always keep a backup of original HEIC files before conversion.
2. HEIC files use advanced compression. Converting to JPG/PNG will result in larger file sizes.
3. JPG format does not support transparency. Transparent areas will be filled with white.
4. PNG format preserves transparency but results in larger file sizes.
5. EXIF metadata is automatically removed for privacy protection.
6. Color profiles and HDR information may not be fully preserved in conversion.
7. Multi-frame HEIC (Live Photos) only converts the main frame.
8. Very large files or many files may cause memory issues on low-RAM devices.
9. Do not close the browser tab during conversion processing.
10. The tool processes files locally. Internet connection is only needed to load the page.
11. Maximum 50 files per batch, each file up to 50MB.
12. Duplicate filenames are automatically handled to prevent overwriting.
13. Image orientation (EXIF Orientation) is automatically corrected for phone photos.
14. For maximum quality, use 95% JPG quality or PNG format.
10. Quick Checklist
☐ Confirmed the access address is https://www.qudo.cc/ja/heic-to-jpg
☐ Kept a backup of the original HEIC files
☐ Uploaded HEIC files (up to 50 files, each up to 50MB)
☐ Selected output format (JPG or PNG)
☐ Configured quality settings (for JPG) or resize options (if needed)
☐ Set file naming preferences (if needed)
☐ Started conversion and waited for completion
☐ Downloaded converted files (ZIP or individual)
☐ Opened the results to verify quality and format