How to Remove Author Information from Word Resume Before Sending?
Document Properties · Privacy Cleanup · Comments & Revisions · Multi-Platform
Recommended Tool: https://www.qudo.cc/ja/document-privacy-checker
Suitable for job seekers who need to remove author, company, comments and revision data from Word resumes before sending to recruiters.
This article helps you understand hidden privacy information in Word documents and introduces complete cleanup methods for Windows, Mac and browser-local processing. Qudo provides a browser-local Office privacy inspection tool.
A Word resume may appear to contain only your name, contact information, education and work experience, but the file may also store another set of information internally, such as document author, last editor, company name, commenter names, revision history and creation software. This content is usually not displayed in the resume body, but may be discovered when the recipient opens 'File Properties', views comments or uses document analysis tools.
1. What Is Word Author Information?
Author information in Word documents belongs to document properties, also known as metadata. Common document properties include: author, last modifier, title, subject, keywords, category, company, manager, creation time, modification time, last print time, creation software, template name, document version information.
Word typically auto-fills author information for new documents based on the username setting in Office. Microsoft also states that Word uses the Office 'username' setting to generate author properties for new documents, and this username may also appear in comments and revision records.
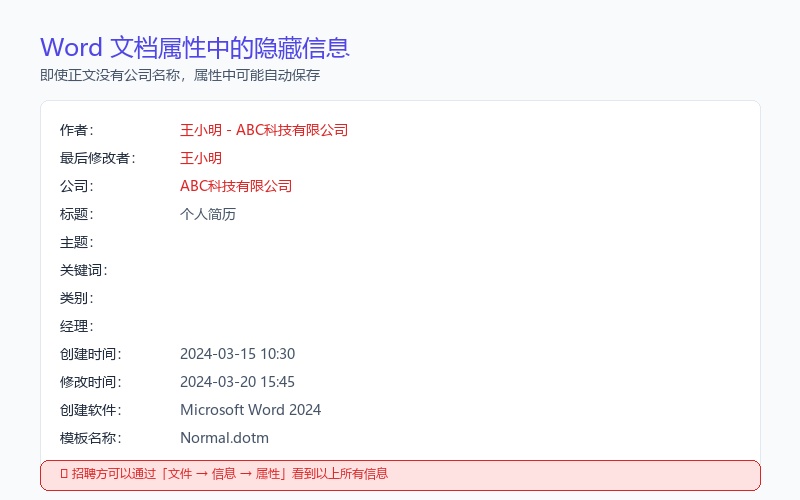
For example, if your Office account name is: Wang Xiaoming - ABC Technology Co., Ltd.
After creating a new resume, the document properties may automatically save:
Author: Wang Xiaoming - ABC Technology Co., Ltd.
Last modified by: Wang Xiaoming
Company: ABC Technology Co., Ltd.
Even if the original company name does not appear in the resume body, recruiters may still see this content through file properties.
2. Why Is Deleting 'Author' Alone Not Enough?
Many people open: File → Info → Author, then delete the author name. This only handles part of the information and does not guarantee the resume has been cleaned.
Author names may also exist in: document core properties, last modifier field, comments, revision records, document version information, custom properties, company and manager fields, headers and footers, hidden text, custom XML data, embedded objects, image metadata, cloud history versions.
Microsoft's list of Word hidden content also includes document properties, personal information, comments, revision marks, hidden text, custom XML, template names and server properties.
Therefore, cleaning a resume should use the 'Document Inspector' for a complete check, not just modify the author name.
3. Which Resumes Especially Need Checking?
The following situations recommend privacy checks before sending:
• Resume created on a company computer
• Resume saved in company OneDrive or SharePoint
• Resume modified on a colleague's or friend's computer
• Resume written or polished by a third party
• Modified from an online template
• Word 'Track Changes' was enabled
• Comments were used to communicate revision opinions
• Content copied from an old resume
• Personal photos, certificates or work screenshots inserted
• File edited on different devices and Office accounts
• Filename contains company, department or internal project names
If the resume has never used comments and revisions, and was only created and edited on a personal computer, the risk is usually low, but it is still worth checking once.
4. Save a Copy Before Cleaning
Some content deleted by the Document Inspector may not be recoverable. Therefore, it is not recommended to operate directly on the only resume file.
First use 'Save As' to create a copy:
Zhang_San_Resume_Original.docx
Zhang_San_Resume_SendVersion.docx
All subsequent cleaning should be done in the 'Send Version'. The original can retain comments, revision records and editing information, stored on a personal computer or protected cloud drive; the send version only retains the final content that recruiters need to see.
Microsoft also recommends running the Document Inspector on a copy of the original document, because deleted data may not be recoverable through undo operations.
5. Handle Comments and Revision Records First
If the resume has used the 'Review' feature, don't rush to run cleanup tools. First confirm whether the body text is already the final version.
Check revision status: In Word, open Review → Track Changes, and check whether 'Track Changes' is still enabled. If it is still on, you should turn off tracking first to avoid saving the file with new modifier information being recorded.
Accept or reject changes: Review the modified content in turn, confirming which ones need to be kept and which need to be deleted. Finally you can choose: Review → Accept → Accept All Changes.
Don't just select 'No Markup' view. 'No Markup' only temporarily hides revision marks; it does not truly delete them.
Delete comments: Check whether the right comment area still retains revision suggestions, recruitment direction, salary discussions, contact information, original company name, polishing personnel names, or other content not suitable for public disclosure. After confirming they are no longer needed, select: Review → Delete → Delete All Comments in Document.
6. Complete Cleanup Method for Windows Word
The following steps apply to Microsoft 365, Word 2024, Word 2021 and newer Windows desktop versions of Word.
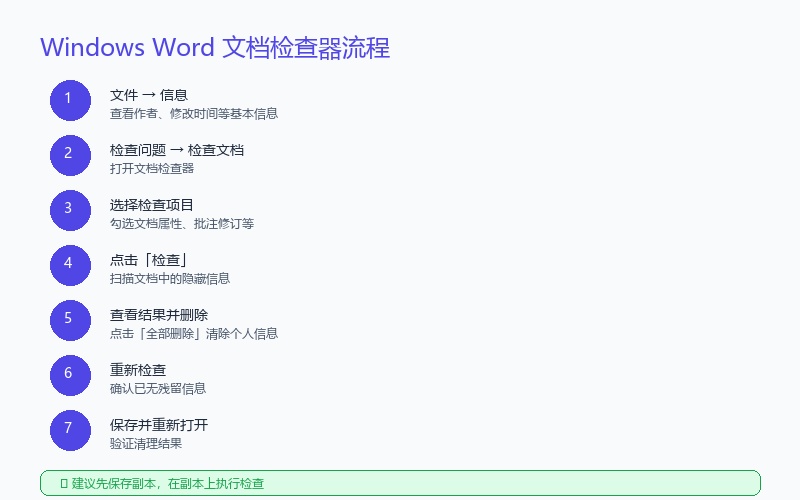
Step 1: Open the send version resume. Confirm the current open file is the copy, not the original.
Step 2: Go to the file information page. Select: File → Info. Here you can usually see author, last modified time, file size, title, etc.
Step 3: Open the Document Inspector. Select: Check for Issues → Inspect Document.
Step 4: Select check items. It is recommended to select at least: Comments, Revisions, Versions and Annotations; Document Properties and Personal Information; Headers, Footers and Watermarks; Hidden Text; Custom XML Data; Invisible Content; Embedded Documents or Objects; Document Server Properties.
Step 5: Start inspection. Click 'Inspect'. Word will scan the current document and list found issues.
Step 6: Review results. Don't click 'Remove All' as soon as you see it. First judge whether the relevant content is still needed. For example: Document Properties and Personal Information can usually be cleared; Comments and Revisions should be deleted only after confirming the body text is finalized; Headers and Footers may contain normal names and page numbers and should not be blindly deleted.
Step 7: Remove personal information. Click 'Remove All' next to 'Document Properties and Personal Information'.
Step 8: Re-inspect. After deletion, click 'Re-inspect'. Ideally 'Document Properties and Personal Information' should show no related items found.
Step 9: Save and reopen. Save the file, completely close Word, then reopen the send version resume. Go back to File → Info and check whether author and related personnel still exist.
7. Manually Check Advanced Properties
After the Document Inspector is complete, you can also view advanced properties. Select: File → Info → Properties → Advanced Properties.
In the 'Summary' tab, check: title, subject, author, manager, company, category, keywords, comments. Unneeded information can be left blank.
In the 'Custom' tab, check whether there are: internal project numbers, department names, client names, company custom fields, template plugin-generated properties. If you find unneeded custom properties, select and delete them.
Note: Creation time and modification time are sometimes automatically maintained properties, and the Word interface may not allow direct modification. The focus should be on information that can identify personal or organizational identity.
8. How to Handle Mac Word?
According to Microsoft's current documentation, Word for Mac does not have exactly the same 'Document Inspector' as the Windows version. Mac users need to manually view and modify document properties.
View document properties: In Mac Word, select File → Properties, go to the 'Summary' tab, check and modify title, subject, author, company, manager, keywords, comments.
Check custom properties: Open File → Properties → Custom, select unneeded properties and delete them.
Manually handle other information: Mac users also need to separately check comments, revision records, hidden text, headers and footers, images, embedded objects, filename.
Since the Mac version lacks a complete Document Inspector, after processing it is recommended to use an independent Office privacy inspection tool for re-inspection.
9. Use Qudo to Check Word Privacy Information in Browser
You can use Qudo's Office Privacy Check & Cleanup tool to inspect DOCX files. This tool is suitable for the following situations: no Windows version of Word installed, using Mac version of Word, want to do a second check before sending, unsure whether the file still has author and comment information, need to check multiple Office documents simultaneously.
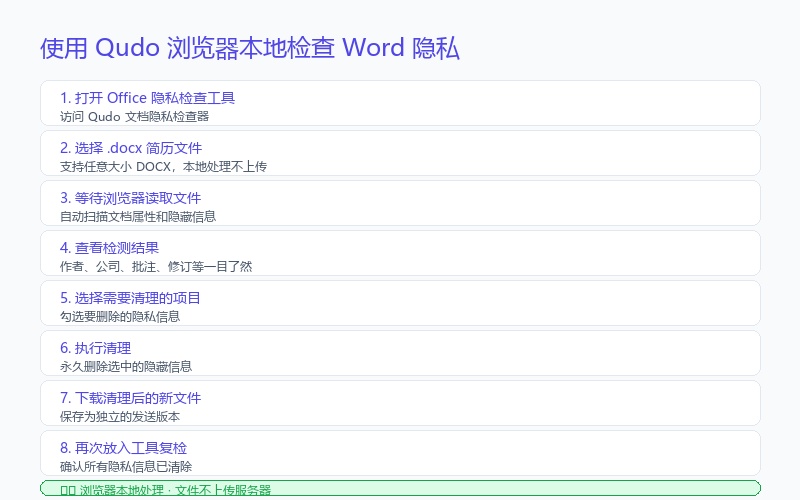
Basic steps are as follows:
1. Open the Office Privacy Check & Cleanup tool;
2. Select the .docx resume to be checked;
3. Wait for the browser to read the file;
4. View detected author, last modifier, company and other properties;
5. Check comments, revision information and hidden content;
6. Select items to be cleaned;
7. Execute cleanup;
8. Download the cleaned new file;
9. Put the new file back into the tool for re-inspection;
10. Open with Word to confirm content and layout are normal.
Files are read and processed locally in the browser, no need to upload to Qudo servers.
For important resumes, a more reliable approach is: Word Document Inspector cleanup → Qudo re-check → Reopen to check layout → Send.
10. How to Verify Author Information Has Been Deleted?
Method 1: Re-view Word file information. Close and reopen the cleaned file, then go to File → Info, check author, related personnel, company, title and tags.
Method 2: Run the Document Inspector again. Re-execute: File → Info → Check for Issues → Inspect Document, confirm 'Document Properties and Personal Information' no longer reports issues.
Method 3: View Windows file properties. In File Explorer, right-click the DOCX file → Select 'Properties' → Open 'Details' tab → Check author, title, subject, tags and company fields.
Method 4: Open on another computer. If conditions permit, copy the send version to another device and open with a different Office account. Check author in file information, commenter names, revision records, document properties.
Method 5: Inspect DOCX internal structure. A .docx is essentially an Office Open XML compressed package. For technical users, you can rename .docx to .zip and unzip to重点 inspect docProps/core.xml, docProps/app.xml, word/comments.xml and other files.
11. Photos May Also Bring Extra Information
If personal photos, certificate screenshots or work images are inserted in the resume, you also need to pay attention to image metadata. Images may contain: camera model, shooting time, GPS location, editing software, author and copyright information.
Word may reprocess some information when inserting images, but you cannot assume all metadata will be deleted.
A more reliable approach is to clear photo EXIF information before inserting into the resume, and keep a processed copy of the images.
12. Do You Still Need to Check After Converting to PDF?
Yes. Converting a Word resume to PDF can reduce the possibility of recipients directly modifying the document, but it does not automatically guarantee all privacy information has been completely cleared.
PDF may still contain: author, creation software, creation and modification times, XMP metadata, hyperlinks, comments, forms, attachments, hidden text, image metadata.
If the final file to be sent is a PDF, you should perform another metadata check on the generated PDF, rather than assuming everything is fine after Word cleanup.
Recommended workflow: Clean Word → Export PDF → Check PDF metadata → Reopen to confirm content → Send.
13. Common Misconceptions
Is it safe after deleting the author? Not necessarily. Last modifier, company name, comments, revision records and custom properties may still expose identity.
Can saving DOCX as a new file delete the author? Usually not. Save As creates a new file, but many document properties are still copied to the new file.
Can changing the filename delete the author? No. Filename and DOCX internal metadata are two different sets of information.
Can converting to PDF automatically delete the author? Not necessarily. PDF may continue to contain author, creation software and XMP metadata.
After deleting comments, will revision records disappear together? Not necessarily. Comments and revisions are different content and need to be checked separately.
Is just selecting 'Don't Show Markup' okay? No. 'Don't Show Markup' usually only hides revision effects; it does not accept or delete revision records.
After uploading to a recruitment website, can the other party still see the original filename? It depends on the recruitment website's processing method. Therefore the filename should also remain professional. Recommended: Zhang_San_Product_Manager_Resume.pdf or Li_Ming_Resume.pdf.
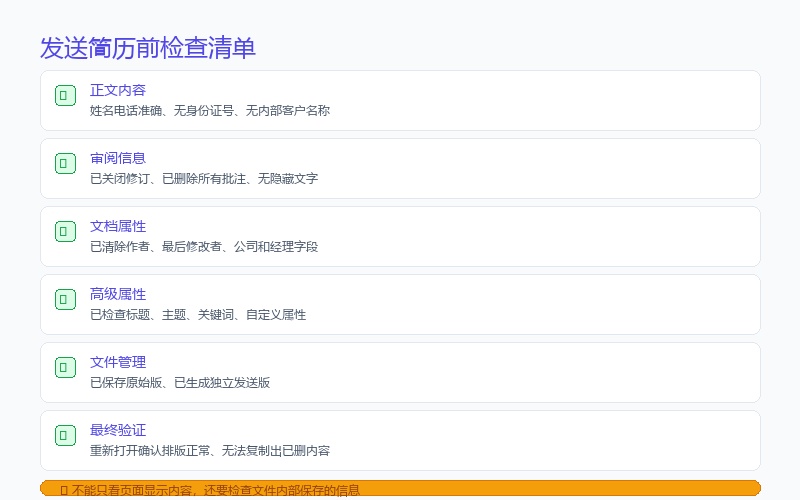
14. Pre-Send Resume Checklist
[Body Content]
☐ Name, phone and email are accurate
☐ No unintentionally retained home address
☐ No ID card numbers
☐ No internal client names
☐ No unpublished project data
☐ Headers and footers have no old company or template information
[Review Information]
☐ Track Changes has been turned off
☐ All revisions have been accepted or rejected
☐ Unneeded comments have been deleted
☐ No hidden text
☐ No invisible objects
[Document Properties]
☐ Author has been cleared
☐ Last modifier has been cleared
☐ Company and manager fields have been cleared
☐ Title, subject and keywords have been checked
☐ Custom properties have been checked
☐ Document Inspector has been run
☐ Cleanup results have been re-checked
[File and Sending]
☐ Original version has been saved
☐ Independent send version has been generated
☐ Filename is professional and concise
☐ Layout is normal after reopening
☐ Photos do not contain unnecessary EXIF information
☐ PDF metadata has been re-checked after converting to PDF
☐ Confirmed the version being sent is the cleaned version
Summary
Before sending a resume, you cannot just look at what is displayed on the page; you also need to check what is saved inside the file.
The most reliable processing workflow is:
1. Save a copy of the original file;
2. Handle comments and revision records;
3. Use Word Document Inspector;
4. Delete document properties and personal information;
5. Re-check and save;
6. Use an independent tool for a second check;
7. If exporting to PDF, check PDF metadata again;
8. Finally confirm the file being sent is the cleaned version.
Author information itself may not necessarily cause serious problems, but it may expose unnecessary real names, original companies, collaborators or editing processes. Spending a few minutes completing the check can avoid information beyond the resume content being sent out together.